To teach computer science concepts to kids one option is to sign up for Scratch student accounts. Scratch is an online coding platform designed especially for children. The registration process has only a few steps. Students are asked to provide a nickname, country, gender, and email address. That’s it!
However, there are pitfalls. In this post, you will discover registration tips to simplify sign up. This will prevent class time being wasted. Plus, it will help students become a safe member of the Scratch community.
About a Scratch Student Account
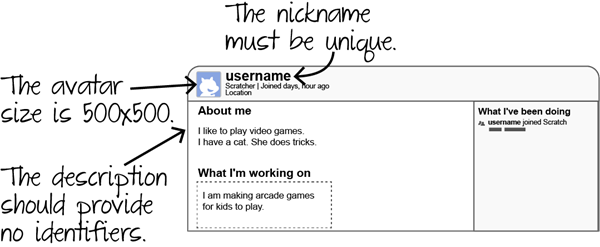
Before you start reading tips, there are a few things you need to know. Every Scratch member is called a Scratcher. When a Scratcher signs into their account they can access their profile. It includes a username, thumbnail avatar, and description. It also tracks activity including shared projects, favorite projects, studios, followers, and comments.
Each account is unique. Which means every Scratcher has their own username. This is one of the most difficult parts of the registration process. Trying to pick a nickname that has never been used before.
It is important to note that profiles are part of the public domain. This means anyone with the Internet can view a Scratcher’s profile. For this reason, there is a need to maintain students’ privacy.
To promote security, Scratch Community Guidelines prohibit the use of real names, addresses, email addresses, school names, and usernames that link to social media. Plus, the information that Scratch collects such as gender and age is kept private. But visitors will be able to see a Scratcher’s username, country, description, and recent activities.

Continue reading to discover four ways to simplify setting up student scratch accounts…
1. Create a Pattern for Usernames
The most important tip is to design a pattern for usernames to follow. Every Scratcher has their own unique username. No two are the same. Since there are over 86 million users, you can imagine how difficult it is to think up an original nickname. The challenge grows when you consider that no username can include the student’s full name or school name.
Registering a new Scratch account can waste class time. This is because students will try repeatedly to think of a unique username only to discover it has already been used. With each failure frustration grows and time ticks away.
Plus, another issue is that username needs to hide the student’s identity from the public. But, at the same time, it should have an attribute that makes it identifiable to fellow students and the teacher. This makes it easier to identify the creator when viewing others work or evaluating projects.
The secret is to design a systematic naming convention that applies to everyone in the class. This simplifies registration. It also has the added benefit of making the username easy for the student to remember. For example, here is a pattern you might want to try: jkcs7a-mike-code
- school initials
- class
- first name
- hobby or interest
2. Use a Scratch Teacher Account to Pre-Register Students
Another valuable tip that can speed up registration is to pre-register students in advance of teaching a coding unit. To do this, teachers must register for a free Scratch Teacher Account. This provides educators with essential classroom management tools.
One of the best perks of a teacher account is being able to instantly create student accounts. It is fast and easy to upload a csv file that contains usernames and passwords. To learn more, follow the step-by-step instructions in the Teacher Account Setup Guide.
Not only will this solution, simplify registration. But it also means that email addresses are not required. This is ideal if students do not have their own email accounts.
Plus, as a bonus, the Scratch Teacher Account provides settings that can be used to customize passwords. For example, an educator can assign a generic password to each account. When students sign into Scratch for the first time, they are then prompted to change their password to something unique. This is an excellent time saver!
3. Develop a Strategy for Assigning Passwords
A third tip for creating Scratch student accounts is to develop a password strategy. This is essential! A lesson can quickly become derailed if a student cannot successfully sign into their Scratch account. The solutions below are varied and are dependent upon grade level.
- Same Password: For primary grades only, you can assign everyone the same password. Please note, this is not a recommended solution for students in older grades as they might try to access others’ accounts.
- Common Password: Have students pick the same password they currently use to access another school program. It could be the one for signing into their computer, learning management system, email address, or an app.
- Favorite Password: Students can use a word that identifies a favorite food, hobby, animal, or interest.
- Lowercase: Encourage students to only use lowercase letters in their password. This is often easier for beginner typists. Before typing in the information have them look at their keyboard to verify that Caps Lock is turned off.
- Show Password Checkbox: A good strategy is to place a checkmark in the Show password box during registration. This will allow students to verify they are typing the letters correctly.
- Create a Scratch Account Tracking Sheet: For younger children teachers can create a document that tracks usernames and passwords. This will allow them to quickly remind students of their information. Please note, Scratch Teacher Account holders can reset student passwords.
4. Upload Icons to Identify Each Student

A final tip about Scratch student accounts is to have everyone in the class personalize their profile by uploading an icon. This is a valuable way to identify student work. The icon displays at the top of a Scratcher’s project, beside a comment, and as a thumbnail in a Class Studio. It acts as a visual cue. Instead of seeing the generic cat icon, you can look for a unique image such as a soccer ball, flower, dinosaur, or robot.
Scratcher Icon Tips:
- Use a square image for best results.
- The ideal size is 500×500 pixels. It cannot be any larger.
- The file is a maximum 512 KB.
- The icon cannot be a student photo!
- Find an image from the Internet. Use clipart in the search term. Filter Google search results by size: icon.
- With a teacher account, you have the ability to remove any inappropriate icons.
How to Create Your Own Avatar:
- Doppleme – Right click on the avatar. Select Save picture as.
- Otaku Avatar Maker – Click the Download button and save to student folder.
TechnoKids Projects for Scratch Student Accounts
Now that you’re ready to tackle Scratch with your apprentice coders, you’ll need some curriculum materials. Check out these super projects that transform a beginner into a confident Scratch programmer.
 | TechnoArcade Become a game developer. Learn how to build scripts, trigger events, loop actions, control timing, debug errors, and more to design one-of-a-kind activities for peers to play. |
 | TechnoCode Make an activity studio that is jam-packed with original creations such as a treasure hunt, maze, silly story, and target game with Scratch. Develop computational thinking skills and ignite an interest in STEM. |
