Teachers often need a quick STEM activity that supports problem solving and computational thinking. With only a few simple materials, you can spark learning. If you have a whiteboard, all you need is a marker and ruler to make a grid. But, if that is not available, you need a few extra materials. Grab a piece of chart paper, construction paper, and either tape or sticky tack. Now you are ready to develop computational thinking skills in your kindergarten, primary, or elementary students.
When to Use This Quick STEM Lesson
A simple grid can transform ten minutes in your school day into meaningful learning. This STEM activity not only targets computational thinking, but also problem solving, sequencing, spatial awareness, and communication skills. And the great news is that kids love it!
There are many opportunities to integrate this STEM lesson. Teachers can effortlessly fit it into transitions. You can also teach this activity during math, social studies, or language arts. By changing the storyline, it can fit in anywhere!
- Are you looking for a new morning warm up? This lesson can easily fit.
- Do you have time before nutrition break, or do you have a few extra moments at the end of the day? Perfect – teach this lesson.
- Did your math lesson or social studies lesson not take as long as you planned? Great – teach this lesson.
- Are you a supply teacher that needs to fill time to avoid classroom management issues? Good news – all you need to do is teach this lesson.
STEM Activity Learning Objectives
This lesson targets essential skills. Your students will be able to:
- identify a problem and plan a solution using simple steps
- break down a task into smaller parts by deciding each movement needed to reach a goal
- test and improve their path when obstacles require a new solution
- use logical reasoning to choose the best route among different paths
- describe movement using positional and directional words (up, down, left, right)
- sequence steps in the correct order to create a path from start to finish
- understand that symbols can be used to represent real objects
- explain thinking clearly using words, gestures, or drawings
- recognize that giving step-by-step instructions is like giving directions to robots or computers
Teach a STEM Activity With Just a Grid
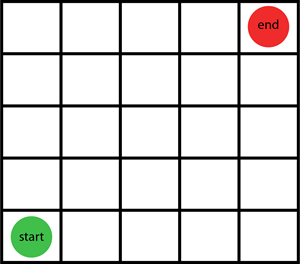
STEP ONE: Make a small grid.
If you are working with kindergarten students, you might want to make it 5 x 5. However, if you are working with Grade 1 or 2 students, you can make the grid larger such as 10 x 10. Older students can use an even bigger grid.
On the grid, pick cells to mark the start and end point. Get creative! You can:
- write the words “start” and “end” on the grid
- draw a green shape for start and a red shape for end
- cut out two different pieces of construction paper and place one in the start cell and one in the end cell
- attach real objects into the grid – these can be stickers, felt objects, or colored beads (anything that is fun and engaging for your students)
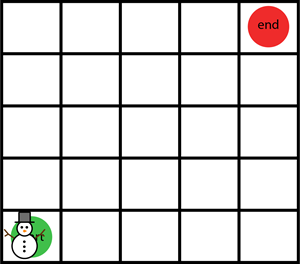
STEP TWO: Pick a character or player to move.
You need a character or player to move from the start point to the end point. This object can be anything. The other day in kindergarten I used an eraser in the shape of a snowman. But what if you don’t have anything you can use? The great news is kids have BIG imaginations! If you have nothing but a marker that you used to make the grid, have them pretend it is a person, car, or animal. It is fun to make believe! Plus, one of the lesson objectives is “understand that symbols can be used to represent real objects”, so you can turn that marker into anything you want!
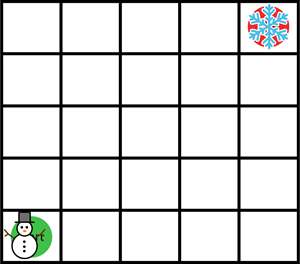
STEP THREE: Create a storyline.
You need a reason that the character needs to move from the start point to the end point. It can be anything! You can integrate the plot into any topic you are teaching. For example, in a Grade 1 habitat unit, the player is a frog who needs to reach the pond.
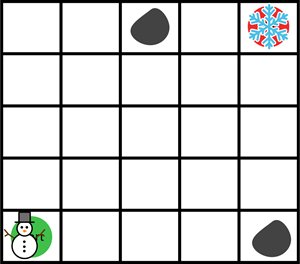
You can personalize the plot without extra planning time. Make it fun! The other day, when all I had was a snowman eraser, the storyline was “The snowman needs to reach the snowflake”. If you can’t think of anything, boost engagement by having the students suggest an idea. This is a good way to encourage creative thinking.
However, if you prefer a set plan here are three storylines you can use:
- help the lost puppy find his way home
- explain to the school bus driver how to get to the school
- sail the pirate ship to the island with the treasure
STEP FOUR: Map the route.
Present students with the problem. Ask questions to have them quietly think about a solution. Pose questions to guide their reasoning.
- How can the character move from the start point to the end point? What routes can they take?
- Do they need to move up, down, left, or right?
- How many steps do they need to move in that direction?
Have students take turns describing their solution. Move the player across the grid to illustrate each instruction. Encourage students to develop multiple routes for the same problem.
STEP FIVE: Add obstacles.
Place one or more obstacles on the grid. The obstacle should fit the storyline. For me, the object in the way was a large rock. I just made a round circle. Simple!
To ramp up the logical thinking, have students think of other problems the character might face on their way to reaching their goal. Don’t worry about what they suggest. You don’t need to be a artist. Remember, one of the learning objectives is that students understand that symbols can be used to represent real objects. So, a rectangle becomes a house, an X shows road construction, and a triangle can be a shark fin.
Now have your students consider how they need to change their solution to go around the obstacle. Once you have the grid made, you can use it over and over again. Just erase or move the obstacles or start and end points and you have an entirely different problem to solve.
Students Love This STEM Activity!
With one grid, you have a reusable tool that can support story creation, mathematical thinking, collaboration, and logical reasoning. It is simple, engaging, and requires almost no prep. The kindergarten students I was teaching became totally focused on how to solve the problem. They LOVED to come up to the chart paper and show their plan. Together we counted the steps. Of course, real objects and a cool plotline help boost engagement. It is so rewarding to watch a student who wanders around the room and is sometimes reluctant to join the group, suddenly participate during carpet time.
Try the activity tomorrow!
TEACHER TIPS
- Erase it, then play again. Use whiteboard markers or removable objects to make it easy to modify the problem.
- Save a file so you are always ready to go! Make a table in Microsoft Word. Insert clipart into the cells to add the start, end, and obstacles. Project the grid onto a whiteboard for instant fun.
- Partner up! Older students can work in partners or small groups. Each team makes their own grid. They can use an object from their desk to act as a character.
- Advanced challenges. You can easily adjust the difficulty level. Add additional obstacles or create “stops” the character must make before reaching the end point.
TechnoKids Has STEM Activities for Kids
If you want more classroom ready ways to teach computational thinking, explore our primary coding projects like TechnoWhiz and TechnoTales. Both include lessons for Scratch Jr that use a grid to code a sequence of instructions. However, if you have older students you might want to check out our blog post about offline coding activities and Scratch. It is a great resource.