In my previous post, I described some classroom games to play with Scratch flashcards. Scratch flashcards are a resource available with the purchase of any TechnoKids Scratch project. Scratch flashcards are large, printed manipulative tools. They are large images of Scratch coding blocks. These instructional materials can be used as part of an offline coding activity. Teachers can demonstrate scripts or introduce coding blocks. Or, students can practice sequencing events. Without a doubt, they are a great way to develop computational thinking skills and spark an interest in programming.
Step 1: Access the Scratch Flashcards
The first thing you might be wondering is, “Where do I find the TechnoKids Scratch flashcards?” These coding resources are available to any TechnoKids customer. The files are accessible from the TechnoHub Resource Center. If you want free Scratch flashcards keep reading! Hint: There is a link below, about halfway in this blog post.
To download a complete set of Scratch coding blocks:
- Sign into TechnoHub.
- Click Welcome Teacher in top right corner.
- Select Resource Center.
- Select Programming.
- Check Scratch.
- Click Start Download. The files will be zipped. Unzip the files.
NOTE: The Scratch 3 folder has two versions: solid color and outline.
Step 2: Pick the Scratch Flashcard Version You Need
Now that you have the Scratch flashcards, what is next? Scratch blocks are color coded. This is an excellent way to sort them into categories based upon function. For example, Motion blocks are blue, Looks blocks are purple, Sound blocks are pink, and Control blocks are orange.
To give teachers options, TechnoKids provides two versions of the flashcards: solid color and outline. Select the print option that suits your situation. Afterwards, cut out each block. There are typically about three coding blocks per sheet of paper.

- The solid color version requires printing using a color printer. This option is ideal for making colorful bulletin boards. However, it can be an expensive alternative due to the amount of printer ink.
- The outline version displays the coding blocks as black and white. When printing, you can insert the correct color of paper into the printer that matches the Scratch blocks. By changing the paper when a new category of Scratch flashcard is printed, you can quickly make a colored set without needing a colored printer. Alternatively, another choice is to print the files and then outline each block with a colored marker.
 |  |
| Solid color flashcards are made with a color printer. | Outline flashcards are printed on colored paper. |
Step 3: Determine the Scratch Flashcards to Print
The next decision you must make is which files you need and how many copies to print. TechnoKids provides you with 12 sets of Scratch flashcards. There are 9 sets of coding blocks including Motion, Looks, Sound, Events, Control, Sensing, Operators, Variables, and Pen. As well, TechnoKids provides flashcards of common tools found on the Stage, Paint Editor, and Sound Editor. You do not need to print them all!
Below are some questions for determining which files and blocks to print:
Are Your Students Beginners?
- Common blocks for beginners are Motion, Looks, Sound, Events, and Control, whereas Sensing, Operators, Variables, and Pen blocks are likely for more experienced students. Print the Scratch flashcards for the coding blocks that match the programming ability of the class you are teaching.
Which Coding Blocks Will You Be Using?
- You may not need EVERY coding block. You can be selective! TechnoKids replicates the Scratch program when organizing the blocks in a flashcard file. They are in the identical order. For this reason, the most popular blocks are near the top or on the first few pages of a file, whereas the more complex or least used blocks are near the bottom or on the last few pages of a file. This means, to save printing, you could always limit the pages to only the blocks you intend to teach. For example, you might only print pages 1-5 of the Motion flashcards, since pages 6-9 contain blocks less common.
Do You Need Common Tools?
- TechnoKids does provide flashcards of common tools on the Stage, Paint Editor, and Sound Editor. However, these files likely do not require printing. This is because the tools are not used in script building and cannot be used as part of an offline coding activity. However, they may make great bulletin board images to help visually reinforce tools and their functions for students.
How Many Sets Do You Need to Print?
- Teacher Set: Print one set of the Scratch flashcards if the offline coding activities will be teacher-directed.
- Group Sets: Print multiple sets of Scratch flashcards if the offline-coding activities will be student-directed. In this case, divide the class into small groups of students (2-4 students per group). Based on the number of groups, print that many sets.
Step 4: Increase Durability of Scratch Flashcards
Since the Scratch flashcards are a manipulative intended for hands-on learning, you may want to increase the durability. With multiple students using the materials over the course of many classes, you need them to last. Below are some ideas:
- Use card stock paper or cut construction paper to letter size.
- Laminate each flashcard.
Step 5: Manage, Organize, and Store Scratch Flashcards
Here are a few tips to keep the Scratch flashcards organized to be used again and again.
- Label It – Store each set of Scratch flashcards separately using manilla envelopes or Ziplock bags. Label by category such as Motion, Looks, Sound, etc. This will make the blocks easier to find later. Just in case you did not use colored ink or paper, TechnoKids has a footer below each image that identifies the category.
- Store It – A complete set of Scratch flashcards will have 12 envelopes or bags. Now what? You may wish to place a complete set of Scratch Flashcards together into a plastic bin. This is an ideal option if you only have one teacher set of flashcards. Alternatively, if you have multiple sets of Scratch Flashcards that you plan to use with groups of students, sort the envelopes by type using hanging file folders. This makes it easier to distribute coding blocks for a hands-on offline coding activity.
- Monitor It – Each time the Scratch flashcards are used in a game or introductory activity, assign a student monitor to collect, organize, and store them. If groups use the flashcard sets, designate one student in each group to take the role of the monitor and return them to the correct location.
Download Free Scratch Flashcards
Would you like to try out TechnoKids Scratch flashcards? Download a free sample set of the Motion flashcards and turn your students into keen and savvy programmers!
Step 6: Play Offline Coding Activities
Computer time is often at a premium. So, to optimize the students’ online Scratch time, prepare them ahead of time with offline activities. The Scratch flashcards are ideal. These large, color versions of the Scratch blocks are a perfect manipulative to introduce and build scripts with the students. In addition to the games mentioned in my previous post, here are some suggestions:
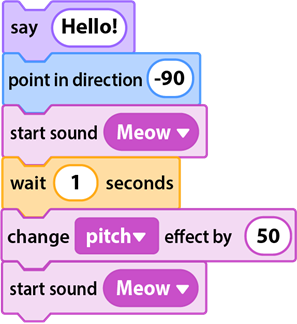
- A Series of Events: Put the big flashcards together to create a sequence of actions. Attach it to the chalkboard or whiteboard with removable tape or tacky putty. Have students explain what they think might happen when a sprite has this set of Scratch blocks:
- Three Steps: Ask students to sequence together the coding blocks to perform three steps. For example, what three coding blocks will make a sprite turn around to face the opposite direction, move to a random spot, and make a think bubble appear?
- Freestyle: Finally, you can also have students build their own scripts and explain what resulting actions will happen.

Optional: Bulletin Board Display
Here is another great option on how you can use the Scratch flashcards. In the computer lab or classroom, display the Scratch flashcards on a bulletin board. As a result, students can see a reminder of coding block options as they are working. If time allows, change the display to showcase new blocks or scripts.
For instance, in the project TechnoArcade, each session introduces a new category of blocks. Students create arcade games for their peers to play as they explore Scratch. The categories of Scratch coding blocks are presented in a logical, sequential way. Students learn programming skills as they make fun, unique, and silly games to share with their classmates. Posting the large Scratch flashcards on a bulletin board is an ideal way to introduce new tools. Add to them at the start of each new game. For example:
- Jumble Tumble – Firstly, this game introduces the Motion blocks. Students direct and loop action to have characters dash and roll across the screen in a fun, chaotic scene.

- Let’s Jam – Secondly, students put together a band to learn about the Sound blocks. They turn the keyboard into a musical instrument which their players can control.

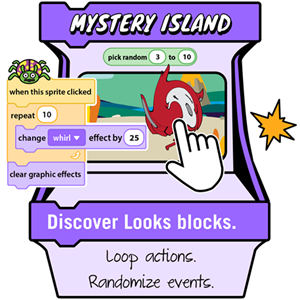
- Mystery Island – Thirdly, students use the Looks blocks to create an imaginary land. Strange creatures change their appearance when the player taps them.

- Lost Treasure – Finally, the students combine all their skills to produce a game. Players collect items and take them to a specific spot to score points. They use a variable to keep score and build a script to end the game when all the hidden items have been found. You need many coding blocks to build the scripts required.

