It is simple and has been around for a long time. Microsoft Paint is an effective and surprisingly powerful tool for the classroom. There are many more capable graphic editors and drawing programs available. But Paint is free and available as it is found in every Windows Start menu in the Accessories folder. It’s also easy to learn and use, and it has the basic tools needed to draw, color, and edit.

See the step-by-step instructions below to get to know the Paint tools. Then try a fun, creative drawing assignment from TechnoBudget. Get elementary or middle school students thinking and drawing. Use Paint to illustrate a money idiom. The literal meaning of the saying is painted in the picture while the real meaning is explained in a text box. Try it out!
Here are some money idioms to get your students started. Pick one and illustrate it!
| Made of money | Laughing all the way to the bank |
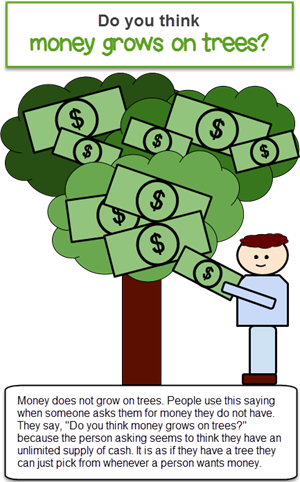
| Money grows on trees | I am broke |
| That is a money pit | Money to burn |
| Money burns a hole in your pocket | A penny pincher |
| Spend money like water | Spend money like it is going out of style |
| Break the bank | A shoestring budget |
- Open Paint. Paint is included with the Windows operating system. It can be found by typing Paint into the search box on the taskbar, or under Accessories or Windows Accessories in the program listing.
- Draw freehand:
- Click the Pencil.
- Click Size. Choose a line size.
- From the Colors group, click the Color 1 box. Pick a color.
- Click and drag in the drawing area.
- Draw with a brush:
- Click Brushes in the Shapes palette. Pick a brush option.
- Choose a size and a color.
- Click and drag to draw.
- Experiment with the other brush choices.
- Draw a straight line:
- Click Line in the Shapes palette.

- Click and drag to draw a line. Press the SHIFT key to make it straight.
- Drag the end handle to change size or position
- Select the line. Press the DELETE key to remove it.
- Click Line in the Shapes palette.
- Draw a curvy line:
- Click Curve. Draw a line on the canvas.
- Click on the line and drag to bend it.
- Draw a polygon:
- Click Polygon.
- Click and drag to draw a line on the canvas.
Click at different spots to draw the polygon sides.
Click again on the start point to draw a filled shape. - To fill the shape with color, click Fill with color. Pick a color. Click inside the shape.
- Draw a shape:
- Choose a Shape from the Shapes palette.
- Click Outline to pick an outline style and click Fill to pick a fill option.
- From the Colors group, click the Color 1 box. Pick a color for the outline.
- Click the Color 2 box. Pick a fill color.
- Click and drag to draw the shape.
- Drag a corner handle to change the size.
- Choose a Shape from the Shapes palette.
- There are three ways to fix a mistake. Try them:
Note: Once you have clicked OFF a shape and it is not selected, you cannot make any changes to it.- Click Undo. Your last action will be cancelled.
- Click Eraser. Click Size and pick an eraser size. Click the Color 2 box.
Pick white. Click and drag to erase. - Click Select. Draw a box around the part of your drawing you want to erase. Press DELETE on the keyboard.
- Draw a text box:
- Click Text . Click and drag to draw a box.
- Write the real meaning of the idiom. Select the text and explore the Text Tools Text tab to change the look:
| Font | Font Size | Style | Color |
Tips:
- Drag a corner handle to alter canvas size.
- Magnify an area using Zoom.
- Copy and paste objects.
- Undo or Redo an action.

This assignment is an extension activity from the technology project TechnoBudget. Teach personal finance. Middle school students budget for a shopping spree and justify a spending plan using Google Sheets or Excel lessons.
Develop financial literacy and money management skills.