
Character rigging animation turns a static object into a character that can move its body parts to create realistic actions such as walk, jump, or wave. In Adobe Animate the Asset Warp Tool uses pins to create joints and bones. These allow a character’s limbs to bend.
Follow the step-by-step instructions to use character rigging animation to transform any PNG clip art into a life-like cartoon character. This free lesson is from the technology project TechnoAnimate, published by TechnoKids. TechnoAnimate is a collection of assignments that teach how to create a space adventure using frame-by-frame, motion tweens, shape tweens, and classic tweens. It is ideal for high school students and animation beginners.
Save a Picture from the Internet
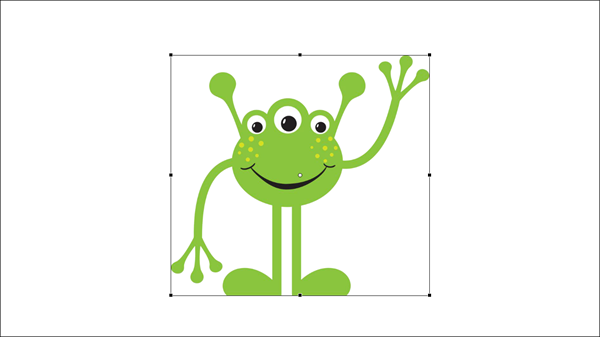
- Search the Internet for a PNG image that you are permitted to use. Try a search term such as free alien clipart transparent.
- Save the image to your device.
Import the Picture File into Adobe Animate
- Create a new document in Adobe Animate.
- From the File menu, select Import. Pick Import to Stage. Select the saved picture.
- Resize the image and move it on the stage using the Free Transform Tool on the Tools panel. TIP: Press the Q key to select the tool.
Use the Asset Warp Tool to Form a Skeleton
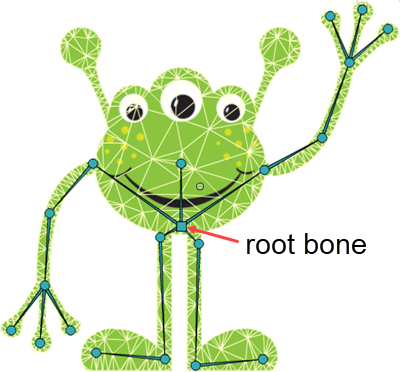
The Asset Warp Tool in Adobe Animate uses pins to form a skeleton with joints and bones that move to create poses. The most important decision you need to make when adding bones is where to add the root bone. This is the first spot you click on the object. All the bones and joints connect from this point. In the case of characters with arms and legs often the root bone should be the base of the spine.
- Select the Asset Warp Tool on the Tools panel. TIP: Press the W key to select the tool.
- Turn on the Create bones slider on the Tool tab.
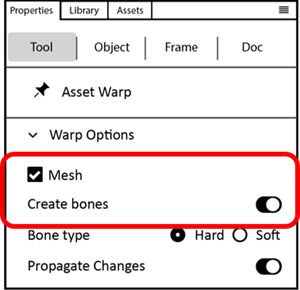
- Double click on the picture where you want the root bone.
TIP: Think before you click. The spot where you FIRST click on a line, shape, or object when using the Asset Warp Tool is the place where a root bone is added. It should be where body parts naturally connect to create realistic poses.
- Use your skills to create bones to form a skeleton. For example:
TIPS:
If you want to add a pin or bone that is NOT connected to the root bone (For example, antennas). Press ESC on the keyboard. . Now add a new pin or create a new bone.
If the mesh disappears, select the Asset Warp Tool, and click on the object.
If you want to delete a pin or bone, select it. Press DELETE on the keyboard. Don’t forget to delete any unwanted joints if you remove a bone.
Add pins to where a body would naturally move such as the neck, shoulder, elbow, wrist, hips, knee, and ankle.
Create a Sequence of Animated Poses
The Asset Warp Tool in Adobe Animate creates a skeleton. By dragging a bone, a character can be made to look like it is lifting its arm, moving its head, or tapping their foot. Each pose is placed into a different keyframe on the Timeline. By applying a classic tween to the sequence, the character moves from one pose to another. Try it!
- Select a frame in the Timeline. Press the F6 key to insert a keyframe.
- Now move the bones to set the start pose.
TIPS:
Do not drag a joint. Instead, drag a BONE to create realistic movements.
When you try to move a bone, sometimes you can add a pin instead. This can break the animation you will add. To stop this from happening, make sure the pointer has a bone symbol.
Zoom into the character to see the bones better.
- Add more keyframes to the Timeline. In each keyframe create a different pose.
- Select the keyframes in the Timeline. An easy way to do this, is to select the LAST keyframe. Hold the SHIFT key and click Frame 1.
- From the Insert menu select Create Classic Tween.

TIPS:
If the classic tween shows on the timeline with a dotted line, it means there is a problem between keyframes. Try these ideas:
– Compare the start and end pose. Does one of the poses have an extra pin? If yes, delete it.
– Right click on the dotted line and select Remove Classic Tween. Now try to add it again.
- Drag the play head or press the ENTER key to watch the animation.
TechnoAnimate Is Ideal for High School Students and Beginners
If you liked this activity and you want to learn more about Animate 2022, check out TechnoAnimate. It uses a project-based learning approach to introduce illustration and animation techniques. Students gain mastery as they create an original space adventure.