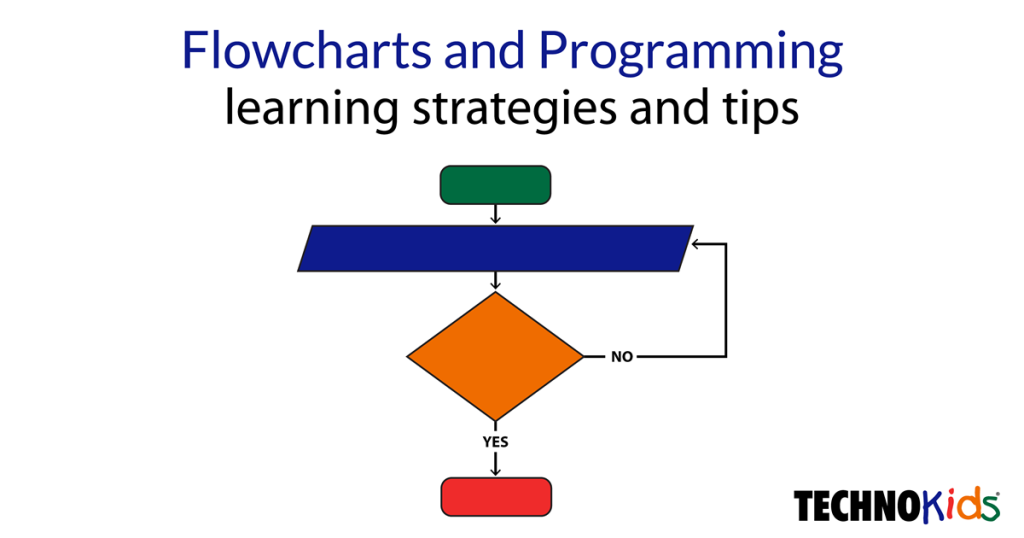
When teaching programming to beginners it is important your students understand how to make a flowchart. A flowchart is a diagram that uses shapes, lines, and arrows to sequence steps. It is a visual way of representing the input, output, decisions, and calculations that take place within a program. There are many benefits to including flowcharts as part of your curriculum. Discover their educational value and helpful strategies that can enhance learning.
Form a Real-World Connection with Flowcharts
A computer science unit should include how to make a flowchart. This is because this task forms a meaningful connection to the real-world. In the workplace, flowcharts are often used by programmers to organize and share their ideas. In fact, they are so useful that most professions use them to communicate how a process works including engineers, scientists, manufacturers, business managers, and health care workers.
For example, when beginning program development, many programmers find that outlining the flow of information and processes visually helps to devise a coded solution. The flowchart provides a rough outline. It becomes a practical tool for identifying variables, pinpointing errors, connecting code, and finetuning ideas. Similar to programmers, students receive the same benefit when they create their own flowcharts.
Another practical purpose of flowcharts in the workplace, is that they can be used as a visual aid for non-programmers, such as clients or investors. Having a documented framework of the program transforms an abstract idea into something tangible that everyone can understand. The flowchart becomes a reference point when explaining how the design works. It also is a concrete way to notice elements that are missing or areas that require further clarification. For students, the outcome is similar. Producing a flowchart is a visual way of demonstrating to the teacher an understanding of programming concepts. It also frames a discussion about design elements and code.
If you want to include flowcharts in your computer science unit and you also value real-world applications of learning, then take a look at TechnoPython. This STEM technology project gradually introduces flowcharts to students in a way that makes them easy to understand. The activities also emphasize the role of programmers in the workplace.
Flowcharts Develop Computational Thinking Skills
Yet another reason teachers should include how to make a flowchart within their curriculum is to develop computational thinking. Computational thinking is a problem-solving process that has four parts: decomposition, pattern recognition, abstraction, and algorithms. When designing a flowchart, each of these parts are blended to produce a valuable learning opportunity:
- Decomposition: Decomposition is breaking down a task into smaller parts. When creating a flowchart to illustrate the steps in a program, students must separate every action and trigger into shapes. They divide the input, output, and logical decisions into individual elements. These are then connected using lines with arrows to show the flow of information.
- Pattern Recognition: Pattern recognition is looking for similarities. When mapping the parts of a program, students must notice the instructions that repeat. Within the flowchart, they will then create a series of steps, with a line that joins the last step to the first step. This illustrates a loop within the code.
- Abstraction: Abstraction is focusing on important information, while ignoring irrelevant details. Designing a flowchart encourages students to be concise. In this form of graphic organizer there is a limited amount of space within a shape to describe each step. Moreover, often there is a restriction based upon screen or document size. These limitations require that students focus on relevant details only.
- Algorithms: Algorithms are step-by-step instructions that outline the solution to a problem. They can take many forms such as a written description, sequenced symbols, or a graphical representation. In the case of a flowchart, the algorithm is transformed into a visual organizer that maps the steps in a program.
Introduce Flowchart Shapes
When teaching how to make a flowchart it is important to explain that shapes have meaning. These symbols are standard. For example, an oval is used to illustrate the start and end of a program, whereas a diamond shows a decision such as yes or no.

Use an oval to mark the beginning and end of the program.

Use a parallelogram to show input or output. Input could be the user entering information. Output could be a message on the screen.

Use a rectangle to process an action. It could be a formula to calculate a value, or it might be a step that modifies text.

Use a diamond to make decisions. This shape will have two or more lines that come from it – one for each outcome. This step might ask a question or provide options. The result could be true or false, yes or no, or choices (red, blue, or green).

Use lines to connect the shapes. The arrows show the direction of the steps. Some lines should include labels, such as yes or no, to explain what is happening.
Tip for Teaching How to Make a Flowchart
Start Simple with a Familiar Task
When teaching how to make a flowchart it is advisable to begin with a simple program with only a few steps. It is best if the sequence is a linear flow and does not include branches or loops. As well, the task should be familiar so that students can draw upon experience.
This is an ideal start point because it introduces a new skill in a non-threatening way. Students can practice computational thinking without the strain of too many complexities. This allows them to gain confidence as they break down the program into individual parts, classify them by type (start/end, input/output, process, decision), eliminate irrelevant details, and sequence the steps.
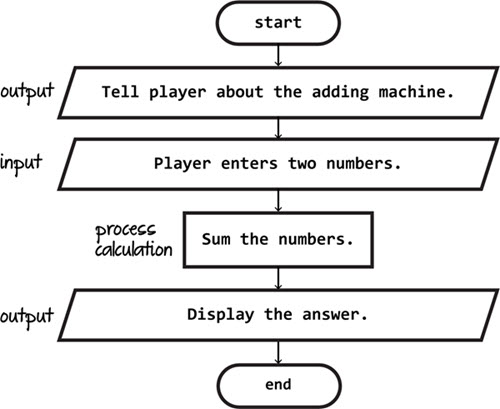
A fun task for beginners is to create an Adding Machine that sums two numbers. A calculator is something familiar. It is on every phone and computer. Since it is recognizable, student can transfer their existing knowledge to the task. This enables them to focus their attention towards organizing the program components into a flowchart.
Expand Knowledge to Include Decision Making
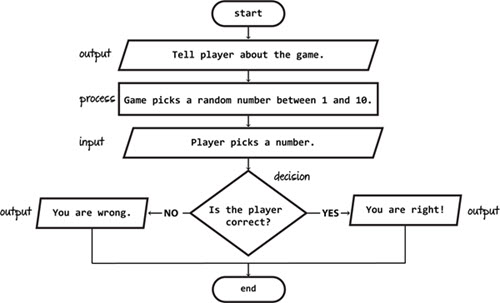
Once students understand the basics of building a flowchart, they are ready for a more complicated task. It is now time to introduce a program that includes decision making. This requires branches to illustrate the outcome of different options. In addition, some of the flow lines that connect the shapes will need labels to identify their purpose. To gradually develop expertise, this task should only have two choices such as true or false or yes or no.
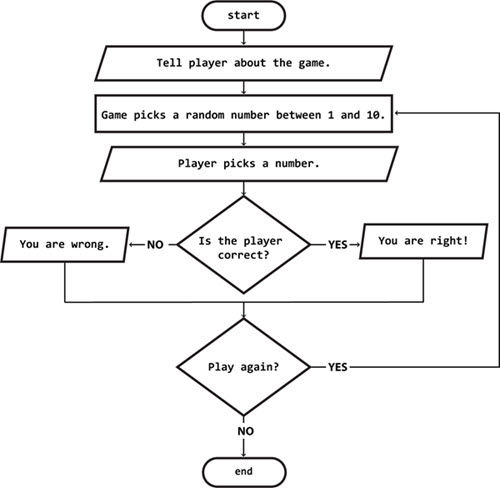
A task that will engage students is a guessing game. Players must correctly pick a number between 1 and 10 to win. Although this program only has a few steps, it uses all the standard shapes in a flowchart and has branches.
Apply Pattern Recognition to Loop Instructions
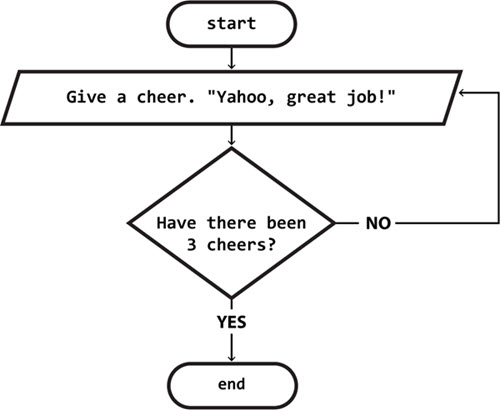
Now that students have a solid understanding of how to make a flowchart, they should add a loop. A loop repeats a set of instructions. In a flowchart, a line is used to connect the last step in a series to the first step.
Designing a flowchart with a loop requires students to apply pattern recognition to notice the repetition within a program. Instead of listing steps over and over again, a flowchart lists them once and then shows a decision that controls whether a sequence repeats. The loop can be a pre-determined number of repeats, such as cheering “yahoo” three times. Alternatively, it can be controlled by a value such as if a player selects to play again.
A simple cheer is a great place to start making loops in a flowchart. Now that students understand the meaning of the standard shapes and branches, they can focus upon the direction of the lines. Since only the output is repeated, there is a simplicity to the task that is ideal for beginners.
The next progression is to add a loop to repeat many steps within a program. This design is more complicated. There are many types of shapes and lines going in multiple directions. To avoid confusion, this task is best done with students that have a firm understanding of flowcharts. A good idea is to add a loop to an existing flowchart such as the above mentioned guessing game. For example, players can decide if they want to play again.
When Is It Developmentally Appropriate to Introduce How to Make a Flowchart?
Designing a flowchart from scratch is a challenging activity. It is a task that requires not only logical and analytic reasoning, but also the ability to think abstractly. Computational thinking can be introduced to young children using a wide-range of learning strategies. Nevertheless, the act of building a flowchart is best suited to children in middle school and high school, or those in Grades 6 and up. This is because developmentally, older students are at a stage where they can understand abstract ideas and explore multiple solutions to complex problems.
Learning Strategies for Teaching Flowcharts to Students
To provide a solid foundation for understanding flowcharts, you can introduce the concept gradually. Below are some ideas:
- Describe the Purpose: Study a flowchart to understand the purpose of the illustrated program. Write a short paragraph that describes what the program does.
- Make a Recipe: Transform a flowchart into a numbered list similar to a food recipe. Provide a written description about what is happening at each step.
- Fill-in-the-Blanks: Read a program description. Then study the flowchart that illustrates each step. Complete the blank shapes to finish the sequence of instructions. To simplify the task, the missing instructions can be provided with students placing them into the correct spot.
- Connect the Shapes: Draw lines with arrows to direct the sequence of instructions in a flowchart. Label the lines with identifiers such as yes or no.
- List the Variables: Study a flowchart to identify the variables that are needed to store, calculate, or manipulate data. Create a list.
- Transform a Recipe into a Flowchart: Take a numbered list of steps in a program and transform it into a flowchart. Use the correct shapes to illustrate each action or process.
- Code Connection: Map code snippets to steps in a flowchart.
TechnoPython Introduces How to Make a Flowchart to Beginners – Each Task Gains in Complexity
TechnoPython is technology project that introduces the Python programming language to beginners. The computer science lesson plans include flowchart activities. Students fill-in-the-blanks to complete the steps in a program. They also match Python code to parts of the flowchart. By the end of the unit, students should understand the purpose of a flowchart and how to interpret their meaning.
