Teach your students how to view two windows side by side when using a Windows device. This will allow them to have an application, such as Word or PowerPoint, open on the left side of the screen. While at the same time, having an assignment sheet, web page, or example file open on the right side of the screen.
When working digitally in a paperless classroom, tiling, or stacking screens can simplify the workflow. Although students can toggle back and forth between multiple windows, it can be cumbersome. Toggling is when the user switches between two (or more) full-sized windows. Unfortunately, toggling is not ideal for all learners. For some students it can be a struggle to remember complex steps or locate information they were previously reading when constantly shifting back and forth. In fact, it can become an obstacle to learning.
A solution is to view two windows side by side. Although this alternative is best suited to larger screens, it still works well on tablets and laptops. Follow the steps outlined to discover how to complete this technique on a Windows device. If you are using different hardware, refer to these blog posts to learn how to stack windows on a Chromebook or dock multiple Safari tabs on an iPad.
Please note, the screenshots in the instructions below use a TechnoKids assignment sheet and Microsoft Word as an example. These are taken from the technology project, TechnoBiography. In this curriculum unit, students develop advanced word processing skills by publishing a biography that details the life of a remarkable person. This provides a sampler of how your students can multi-task.
How to View Two Windows Side by Side
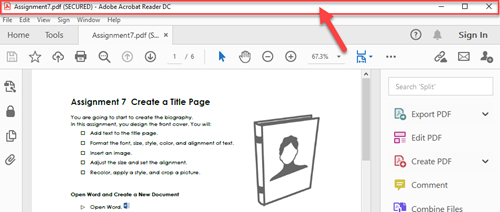
- Open a file or application. For example, you might view a TechnoKids worksheet in Adobe Acrobat Reader.
- Click the top title bar.

- Press and hold the WINDOWS key on the keyboard. Now press the RIGHT ARROW key on the keyboard to snap the window to the right side of the screen.

- Open a second file or application. For example, you might need Microsoft Word to complete a task.
- Click the top title bar.

- Press and hold the WINDOWS key on the keyboard. Now press the LEFT ARROW key on the keyboard to snap the window to the left side of the screen.

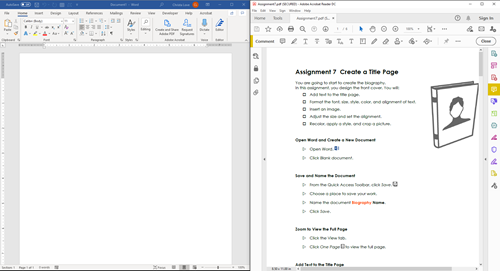
- You will now see two windows at the same time. For example:

Curriculum Units for Microsoft 365 and Windows Users
Are you interested in project-based activities that blend digital literacy into curriculum? Below are three popular TechnoKids technology projects that are ideal for elementary, middle school, or high school students.
TechnoTravel: Promote a weekend getaway. Split the screen to view a web page about the destination on the left side of the screen. On the right side, record the facts using an organizer open in Microsoft Word. Later, follow detailed instructions to create an animated travel advertisement in Microsoft PowerPoint.

TechnoTurtle: Develop simple programs to produce artwork, mazes, and games. Split the screen to view the IDLE Python Editor on the left side of the screen. On the right side, follow the programming instructions outlined on the TechnoKids worksheet in Adobe Acrobat Reader.

TechnoResearch: Create a Fun Fact Card about a topic. Split the screen to view an example file on the left side of the screen. On the right side, type answers using Adobe Acrobat Reader into a TechnoKids worksheet. Once familiar with the task, follow instructions to design a unique research report using Microsoft Word.

